Get yourself ready
- Go through Blackboard Help Center: Assessments and Blackboard Help Center: Grading.
- Request a Blackboard sandbox course and testing student account(s) to check questions and options.
- If you copy a test from one course to another, please check the questions (Blackboard Help Center: Manage Tests) and assessment settings of the destination test.
- Ensure ALL questions and settings are correct before deploying the assessment. Refer to Blackboard Help Center: Manage Tests.
- Prepare a backup plan in case of system failures or any unexpected issues.
- Request support in advance from your department/unit or ITSC (via this online form), especially if you expect a high volume of submissions or many students submitting simultaneously.
- Divide a large test into smaller tests - large question sets may have slowdowns while loading.
Get your students ready
- Create a trial test to identify potential problems and help students get familiar with the Blackboard environment. Students can also self-enroll in the Exam Trial course provided by ITSC for practice.
- Students need to use DUO Two-Factor Authentication (2FA) to access Blackboard. They should avoid changing phones near the assessment date and ensure their setup is complete. Ask students to test their Blackboard login in advance.
- Internet quality in Mainland China varies. Students located there could consider using the CUHK VPN Add-On Service.
- Remind students of the following points:
- Students should take the test with a stable network and computer, instead of mobile phone or tablet. While students might be able to use Blackboard App to take some tests, using it to take graded tests are discouraged.
- Students should check if the answers are auto-saved regularly while taking the test.
- Student should NOT refresh the page / close window / go back to the previous page while taking the test.
- If students encounter any issues with online tests, they are advised to record and report it to the instructor and/or TA immediately.
- Students should ensure they have successfully submitted their attempts and that all attachment(s) are fully uploaded. Verify the details in the submission receipt (e.g., uploaded attachment size).
- For more tips for taking a test, please refer to Blackboard Help Center: Prepare for an Assessment.
Configure the online assessment with the appropriate settings (Ultra Course View)*
* Refer to the last section of this article for information on Original Course View.
Known Issue
|
Visibility
- Access From/Until: Although this setting is configured at the minute level in the UI, based on the evidence observed, access is enabled or revoked approximately at the 30-second mark of the configured minute. Students need to refresh the page to view the assessment.
- The visibility of an assessment and its grade column are associated.
Details & Information (Blackboard Help Center: Details & Information)
- The time displayed on Due date refers to the ':00' second mark. For example, if the due time is set to '11:59 PM', it means '11:59:00 PM' precisely.
- For online test, Do NOT allow class conversation. This is to prevent students from discussing the test with you or classmates before, during, or after the test is available.
Grading & Submissions (Blackboard Help Center: Grading & Submissions)
- If multiple attempts are allowed, files from all attempts for each student will be included in the download. The option to download only the last attempt is unavailable (Blackboard Help Center: Download Assessments). Please contact ITSC if you need support.
- Do NOT select "Post assessment grades automatically" if you don’t want your students to view their grade, especially for tests that are auto-graded.
Assessment results (Blackboard Help Center: Assessment Results)
- You can configure when and which results are displayed to students, e.g.,
- If the option Submission View – “Allow students to view their submission” is selected, all answer choices will be visible to students.
- If the option Question Scores - "Show question scores" is selected, students will be able to see the scores gained for each question (i.e., know whether their responses are correct).
- To restrict students from seeing the test questions after the due date:
- Select “Prohibit new attempts after due date", and
- Uncheck “Allow students to view their submission” and all options under “Assessment results”, and
- Enable auto-submit under "Time limit" and/or "Prohibit late submissions".
Grading (Blackboard Help Center: Grading)
- When you post grades, students can view them, along with any feedback you provide. All feedback for all attempts, even ungraded attempts, is shown to students. (Blackboard Help Center: Post Grades).
- E.g., for assessments that allow multiple attempts, if you add feedback for ungraded attempts, the feedback for those ungraded attempts will be shown after you post grades.
- If you use Complete/Incomplete grading, please note that rubric points will be visible after grades have been posted.
- Posted grades cannot be unposted. So please check carefully before you post grades.
- Student ID is currently NOT shown under Gradebook > Grades. If you would like to input grades to grade column(s), consider downloading then uploading the grades. The file downloaded contains the SID. (Please keep the file secure as it contains personal data.)
Respondus Lockdown Browser and Monitor
- Please refer to the below two info pages:
- To preserve the settings used by LockDown Browser, do NOT modify these settings in Test Options after selecting "Require Respondus LockDown Browser for this exam": 1) Name 2) Open Test in a New Window, 3) Require a password, 4) Password. If these settings have been modified the test status will appear as an "Error."
- Students should make sure they have checked and updated LDB to the latest version. After they have installed / updated Respondus LDB, perform a self-practice to ensure they can complete the trial exam using their computer, equipment and internet connection without problem. They should also join and complete practice exams set up by course teacher / TA.
- You can include PDF files with an online test that requires LDB. Note that Adobe’s PDF viewer includes functions to save and print the PDF. If you want to prevent this, create the PDF using security settings that prohibit printing and saving. (LockDown Browser: Using External Links and Files)
Invigilation with Zoom
- If you are going to host multiple meetings for invigilation, please note that the host should NOT schedule more than two meetings for the same (or overlapping) period, as Zoom only allows a maximum of two concurrent active meetings under one account (Zoom Support). Please apply for external user account or project account if needed. Please also test the accounts before the exam.
- For security, enable Waiting Room and set the meeting as Only Authenticated Users can Join – Domain: CUHK. Also, check in-meeting security options (e.g., do not allow participants to use the chat function).
- Please obtain consent from students if you are going to record the invigilation.
- The gallery view recording can display a maximum of 25 participants (Zoom Support). If needed, please consider hosting multiple meetings for the invigilation.
- The host has to enable “Record gallery view with shared screen” (and "Record active speaker, gallery view and shared screen separately") on CUHK Zoom portal > "Settings" > "Recording" > "Cloud Recording" to record gallery view. Remember to save the updated settings. (Zoom Support)
- You could consider using focus mode in the ZOOM meeting for the invigilation (Zoom Support). You can also select 'Enable focus mode when meeting starts' when scheduling the zoom meeting (Zoom Support).
- Make use of Breakout Room for the communication with individual candidates (without disturbing other candidates).
- Do NOT use spotlight if you would like to record gallery view. When the spotlight is ON throughout a recording, the gallery view is the same as the active speaker view so the gallery view file will not be generated.
Original Course View (to be retired by the service provider)
Set up the online test using the right test options [Original]
- Make sure you fully understand the test options before you use them.
- Availability: Remember to select “Yes” for “Make available to students”.
- Force Completion:
- If you have enabled “Force Completion”, students can enter the attempt once only and it must be completed in one sitting.
- DO NOT select this option, as students would not be able to re-enter the attempt if they have accidentally left the test (e.g. network instability). If you need to give students one more chance, use “Ignore Attempt”. (Blackboard Help: View Grade Details)
- Set Timer:
- The “Timer” counts only the duration of the test.
- If students save and exit the test, the timer continues. If Force Completion is not enabled, students can return to work on the test until they submit or the timer auto-submits, whichever comes first.
- Students who start late would have the same amount of time to take the test and might still submit it after the “Display Until Date and Time” and the “Due Date”.
- For example, for a test with “Set Timer = 3hrs”, “Auto-Submit” and “Due Date: 17 Dec 23:59:59” configured
- students can still start the attempt on 17 Dec at 23:45:00, work for 3hrs, and submit the attempt on 18 Dec at 02:45:00 or before. If the student did not submit the attempt at or before 18 Dec at 02:45:00, the auto-submit happens around or after 18 Dec at 02:45:00 when time’s up. (Blackboard Help: Set timer).
- Date Settings:
- Carefully set the “Display After/Until Date and Time” and “Due Date”. (e.g. especially the “AM/PM”).
- Due Date: Students can still submit their attempts after Due Date. The attempt would be marked as “Late”. You have the option to select “Do not allow students to start the Test if the due date has passed”. This option will prevent students from beginning the test after the due date has passed.
- Total Column: Uncheck “Include this Test in Grade Center score calculations” if you do not want the grade to be included in Total Column in Grade Center.
- Hide results for this test completely from the instructor and the Grade Center: DO NOT select this option. This is for student self-assessment. Results and grades CANNOT be retrieved if this option is selected.
- Adaptive Release:
- If the test is copied from another Blackboard Course using “Course Copy” feature, check both “Adaptive Release” and “Adaptive Release: Advanced”. The outdated Adaptive Release rules from the source course would be copied to the destination course as well. Remove outdated rules.
- By default, grades for automatically graded tests are shown to students after their submissions.
- If you do not want to show grades and/or feedback:
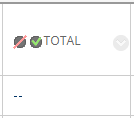
- Hide Grade Columns (including the “Total” column, and any other related calculated columns) from students in Grade Center (Blackboard Help: Can I control when students see their grades and feedback?). You should then see a pink symbol that indicates the column is hidden from students. For example:
- Also/or uncheck all items under Test Options > “Show test results and feedback to students” (Blackboard Help: Results and feedback options).
- Hide Grade Columns (including the “Total” column, and any other related calculated columns) from students in Grade Center (Blackboard Help: Can I control when students see their grades and feedback?). You should then see a pink symbol that indicates the column is hidden from students. For example:
- Please also check if there are any columns hidden from Instructor view, and unhide them in the Full Grade Center to check whether they are actually hidden to students. You can do this by navigating to Full Grade Center > Manage > Column Organization. For detailed instructions, you can refer to Blackboard Help: Organize Grade Data.
- Please note that if a test consists of both automatically graded questions (e.g. MC) and manually graded questions (e.g. Essay), the grade would be shown as “Needs Grading” after the submission, manual grading of the test is required.

Contact us: ITSC Service Desk (https://servicedesk.itsc.cuhk.edu.hk) / elearning@cuhk.edu.hk